Part 26: Behind The Fangs Part III: - RPG Maker Basics: The Database, Part III
Behind The Fangs, Part III - RPG Maker Basics: The Database, Part III♪ BGM: Come Around ♫
Alright, time for another romp through the wonderful world of RPG Maker 2003. The next part we'll go through is the Monster Groups.
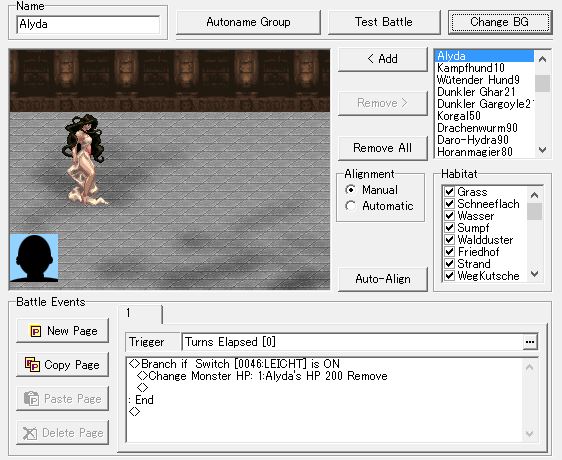
The basic gist for monster groups is that in RPG Maker, you don't say "have a battle with monster X, monster Y and two of monster Z", but rather "have a battle with monster group X", where you previously defined monster group X as having monster X, monster Y and two of monster Z. There, we can then define certain things for this particular fight. So, what can we do here?
- Name: Sets the name for the monster group. This is entirely internal and will never be seen by the average player.
- Autoname Group: Will give the group an automatic name of "MonsterName xNumber", separated with commas. So if I had, say, a group with two zombies and three skeletons, it'd autoname it "Zombie x2, Skeleton x3". Can be useful, but the name has a short character limit, so once you have more than two types of monster, you're usually fucked.
- Test Battle: This opens up a new window that allows you to set up a test battle.

You can pick the party members, their equipment and level, and the general situation. We'll go over things like the terrain and the special battle conditions later when those things become more relevant.
- Change BG: This just changes the displayed background in the display here. It doesn't actually affect the group at all, it's just for display purposes in this window.
- Add / Remove / Remove All: This allows you to change up the group. You can use the selection list on the right to add monsters, and you can select them on the left side to move them around the screen or delete them.
- Alignment and Auto-Align: This determines the way the monsters are positioned around the screen. You can do it manually, force it to be automatic, or you can use the automatic setup and then move them around again with the auto-align button.
- Habitat: This defines the terrain this monster group can be encountered on. Again, this'll probably make more sense once we get into terrain and tilesets.
- Random: This is a special thing that's not a button. You right-click the monster group in the selection menu and you can set it to "random". This will mean that every time you encounter this group, you will face a random amount of monsters from that group.
- Battle Events: This is where the meat of the monster groups is. This will help you define events for battles beyond what the regular skills allow you to do. First:
- - - Triggers: The triggers have their own separate menu.
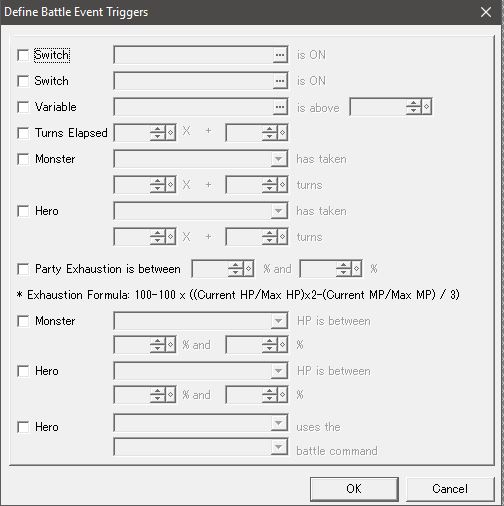
This is similar to the triggers we've seen in the monsters area, particularly the preconditions. You can check for switches, variables, the amount of turns taken, HP levels, "exhaustion" (which we've seen before and is also handily described on the menu), and certain heroes using certain battle commands (like Attack or Defend).
- - - Battle Event Commands: In the bottom of the menu, we can set up event commands, like the one you see on the example image. That one is particularly simple, since it just removing HP from Alyda if the Easy difficulty switch is set. Let's see what we can do in the separate menu:
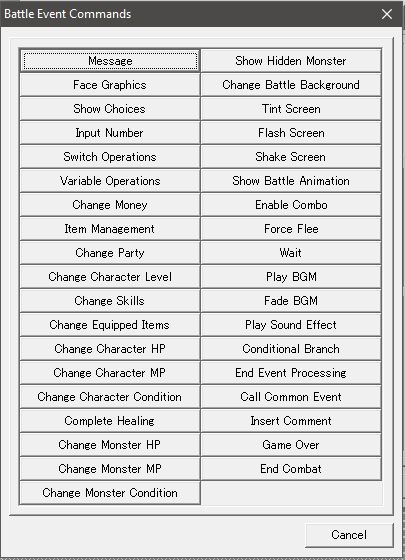
I think a lot of these are self-explanatory, really. And honestly, going over everything would just take forever. One thing that isn't self-explanatory is "Enable Combo". This essentially turns a certain battle command into an multi-use-version of it (like X-Fight in Final Fantasy V). So using Attack after having Enable Combo on will use Attack up to eight times, depending on what you set. You have a large amount of options for futzing around with battles, and if you really put work into it, you can do some crazy shit. However, that's all for the monster groups. Let's move on to the Attributes.
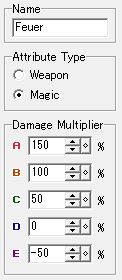
Well, I've waffled on about attributes more than enough at this point. And really, you can't set a lot here. Just multipliers and what it applies to. Simple!
...but not quite THAT simple!
vilkacis posted:
Did we go over how they interact? I don't remember, so: If you stack two attributes of the same type, you'll do whichever one deals more damage. If you have two attributes of different types, however, it uses the one that does less! So even if you have an enemy that's weak against being stabbed but immune to fire, a fire spear does nothing to it.
Which means that if you want physical + elemental weapons that actually do something against enemies that are strong against one or the other, which I'd assume is one of the reasons you'd want to have an enchanted weapon to begin with, you pretty much have to make unique attributes just for those weapons so you can fine tune them.
Now, let's move on to conditions.

There's a bit more here to go over.
- Name: You've probably worked this out.
- Extent of Effect: The condition either ends after the battle or stays after the battle.
- Color: Every condition has a color associated with it. It's used as text color, primarily.
- Priority: Thankfully, this is a simpler priority system than the last one. The highest numbered condition takes priority over the other ones, though I believe the other ones are still present, just not active. If you heal the primary one, the next lower one will take over, unless its priority is fairly low compared to the other one - there's a quirk in the engine where conditions don't stack if the priority is far apart - the ones with the lower priority will just get healed automatically. Weird shit.
- Action Restriction: This allows you to put a restriction on certain actions - either none, that you can't use any action (paralysis), that you attack enemies randomly (berserk) or that you attack allies randomly (confusion).
- Hit Chance: Use this if you want to reduce the character's hit chance if they are affected with the condition - like blindness.
- Additional Effects: These are pretty self-explanatory - just tick the boxes if you want your condition to have an effect. We have the first two in VD2 with the Phantom and Mirror status effects, which we'll see eventually. The third one is your standard cursed status.
- Susceptibility: Much like the attributes, these are the different hit chance modification levels.
- Recovery: You can set the player to be able to recover from conditions in one of two ways - either over time, or from damage (think waking up from the sleep status by being hit).
- Base Statistic Alteration: You can set the condition to reduce or raise certain attributes - so for instance, a curse could half all your attributes, or a berserk state could double your attack power.
- Prevent the Following Skills from Being Invoked: This should be fairly self-explanatory as well. Skills with a certain influence of the attack or intellect variety will be disabled. So basically imagine a condition for "I got thwacked in the head really hard and I basically have brain damage now".
- Animation: Self-explanatory. However, we will need to go through the animations before this makes total sense.
- HP & MP: Conditions can both heal and damage both your HP and your MP, both per turn and per X amount of steps on the world map.
And that's basically it for the conditions. Now, it's time for animations!

These are the battle animations. This is where a lot of the magic happens for VD2. First of all, let's look at a regular battle animation and go through our options.
- Name: Entirely internal this time.
- Animation File: This allows you to pick a sprite sheet for the different frames of animation. There's two types of sheet: Battle Animations, which have 96x96 tiles, and Large Animations, which have 128x128 tiles. VD2 doesn't have a single Large Animation.
vilkacis posted:
Worth noting: animation sheets are limited to 25 frames (5*5). I guess it's a good thing if it discourages you from recreating Knights of the Round in RM, but it's kind of super obnoxiously limited if you're trying to do something fancy with it.
...it's worse in 2k, because it doesn't even have the large type animations.
- Target: This just displays an enemy sprite in the display.
- Frames: Sets the amount of frames the animation will have.
- Effect Timing: Sound effects, flashes and screen shakes can be set to happen on specific frames here.
- Scope: The animation is carried out on either all enemies (global) or on one enemy (local).
vilkacis posted:
Global is more "target the entire screen" - you can have multi-target effects use animations with local scope, and it'll play the animation on each enemy affected. Global is more for large-scale effects like summons or such.
...It's also somewhat obnoxious in that you can't do both. You can't summon Ramuh to call down a lightning bolt on each enemy, because that results in either A, Ramuh clones showing up to nuke enemies individually, or B, Ramuh zapping the middle of the enemy formation and potentially not hitting anything.
- Y Axis Line: When you have the animation set to "local", you can set three heights for the central line of the animation, either high, middle or low.
- Frame No.: This lets you select the frame you want to edit.
- Use Grid: Enabling this will make it so that moving an animation cel around always moves it by 8 pixels, essentially moving it on a 8x8 grid.
- Clone Previous: Copies the previous frame.
- Mass Copy/Clear: Allows you to copy or clear a large amount of frames at once.
- Autocomplete: Carries a certain range of animation cels through a certain range of frames.
- Mass Modify: I guess this is worth looking at in a bit more detail.

In Mass Modify, you can fuck with a lot of different things. You can fiddle with the colors, the image magnification and transparency, and change the images used.
If I'm being spartan about this, it's because I haven't spent a lot of time fucking with this. Anyway, with all these tools, you can drop different animation cels onto the display and make an animation with it. Now, let's look at something else here.

This is one of Valnar's animations, in particular, him casting a spell. You can see that there's a variety of animations down there in the cels, like blocking and being affected by a condition, and all his animations have been built together by using the battle animations. Now, let's go to the next part, Animations 2, where we set the animations for our heroes, and where this comes together with what we see here.

This is the first page of the character animations. Here, you can set different kinds of weapons. The character animation is fixed in this place, you just give them different weapon graphics for different weapons, which you can then connect with different items. However, VD2 here completely avoids this system. You can also set the speed, though we also don't have to worry about that, since VD2 uses battle animations, which have fixed speeds thanks to being made frame by frame.

The poses are similar to the weapons, in that you can set certain poses to certain states, like "dead", "idle" or "use item". Again, VD2 completely sidesteps this system.
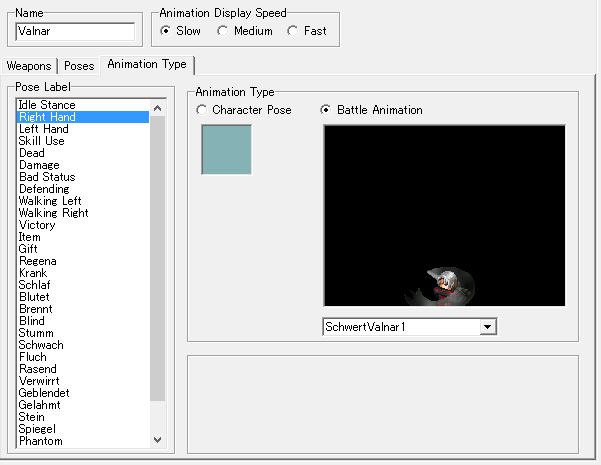
Finally, we have animation types. Here, we can connect the poses we've defined with either the character animations we've set, or with battle animations. Therefore, here is where this game just does everything by attaching battle animations to everything.
Again, I'm being kind of brief because this is graphics stuff, and I'm not good with graphics stuff. Finally, let's look at the battle layout settings.
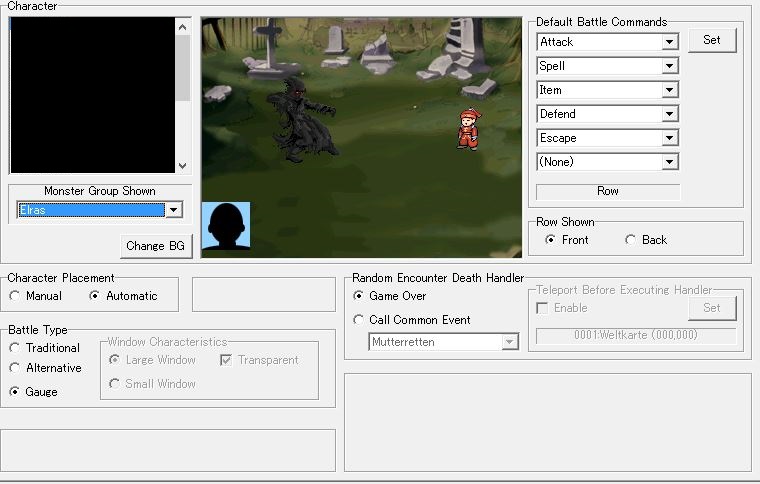
This is where you set up the battle layout for your party.
- Character: Select the character you want to set the layout for here.
- Monster Group Shown: This is just for the display again.
- Character Placement: You can either manually move the characters and set them to a specific point in the display, or just let the engine handle it. As you can see, VD2 does it automatically.
- Battle Type: This is probably easiest if I just give you the description from the help file:
-> Traditional: The HP and ATB bar are shown in the menu window. When using a skill, the amount of MP consumed will be shown next to its name. It is also possible to change the size of the window.
-> Alternative: The HP, MP and ATB bar are shown in the menu window. You can choose between fight, autobattle and escape before the ATB gauges start counting. It is also possible to change the size of the window, and whether it is transparent or not.
-> Gauge: The hero's face graphic, HP, MP and ATB bars are displayed in a row at the bottom of the screen. (The numbers and gauges used will be different depending on the system 2 graphic used)
So this doesn't actually change the type of battle - you can't switch between the turn-based system and the ATB system or anything like that, you just change the display.
- Default Battle Commands: Just like we did with the classes, we can set the battle commands for specific characters here.
- Row Shown: This shows the character either in the front or back row. Again, this is just for the display.
- Random Encounter Death Handler: Finally, if you die to a random encounter, you can either have it call the game over, or you can call a specific event, as well as teleport to a specific map before executing the event. So you could have something like a Pokemon style "lose X gold and black out, teleporting back to the last inn you used" thing when losing in random encounters.
Anyway, that'll be enough for now. Next time, we'll look at terrain types and tilesets, amongst other things!